At a Glance
- Operating Pressure: -5 to 30 Psig
- Outputs: Analogue 0 to 5 Vdc, or Frequency,
- Optional Outputs: 0 – 10 Vdc or 1 to 10 Vdc
- Accuracy: ±2% Full Scale
- Repeatability: ±0.5% of Reading
- For testing piston ring sealing throughout the full RPM range.
- 0-5V Analogue or frequency output to your dynamometer.
- Ideal for ring flutter and ring end gap monitoring.
- Applications include cylinder wall distortion ring clearance and ring tension.
- Easy to maintain with no moving parts
- 40:1 turndown ratio
- Various inlet and outlet diameters
Description
Applied Measurements are a UK-approved distributor for J-TEC flow meters.
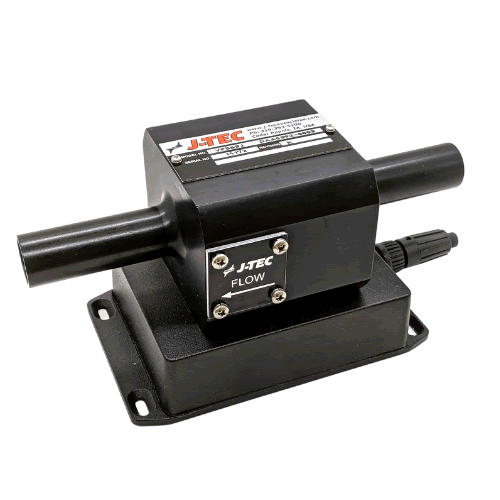
The in-line blow-by flow meter VF563 monitors the air flow rate of blow-by gases and is attached to the crankcase vent in crankcase ventilation systems. It is specifically designed to measure crankcase blow-by and delivers an analogue or frequency output to your dynamometer.
Monitoring crankcase blow-by can determine if there are any piston ring failures or leaks. The VF563 blow-by meter measures precisely how much blowby is happening inside the engine.
The J-Tec Meter has very little pressure drop, there’s almost no restriction to the flow so you’re not inducing backpressure on the crankcase in order to get the measurement.
Kevin Donahue of J-Tec Associates, https://youtu.be/niCS7a0PqSs
The flow meter delivers a 0-5V output which is compatible with most engine dynamometers.
It is very simple to use. Simply connect a hose to the in-line of the flow meter that’s connected to the crankcase vent. You can now measure in real-time how much piston ring leakage you have, instead of using old methods like leak down test or compression test. Plus, it allows you to measure the crankcase blow-by through the full operating range of the engine.
Its design incorporates a small strut that offers minimal flow restriction ensuring high accuracy over extended ranges.
The VF563 flow meter has no moving parts meaning they’re trouble-free making them very easy to maintain.
Various inlet and outlet diameters are available depending on the size of your engine. From a small 3/8 Inch (9.5mm) up to a huge 4-inch (101.6mm).
We can also offer a blow-by canister to use with the in-line flow meter that helps to minimise the effect of engine pulsations and collects oil and mist.
Applied Measurements are a UK-approved distributor for J-TEC flow meters.
Watch the below video for an in-depth description from Kevin Donahue of J-Tec Associates describing the VF563 blow-by flow meter.
Technical Specifications
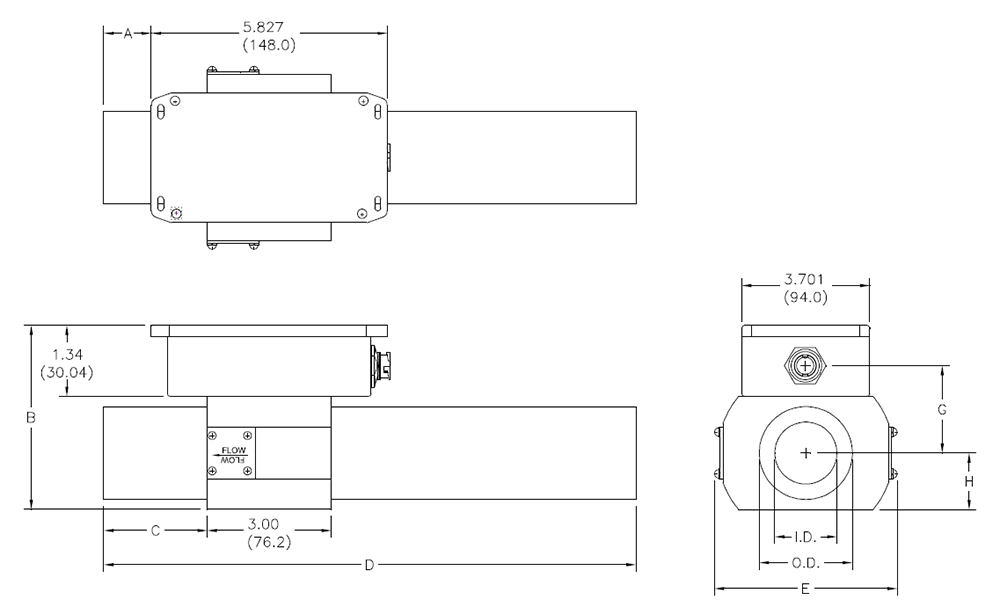
Product Dimensions
| Model | VF563AA | VF563A | VF563B | VF563J | VF563K | VF563C | VF563F |
|---|---|---|---|---|---|---|---|
| Line Size ID Inches (mm) | 3/8 (9.5) | 1/2 (12.7) | 5/8 (15.9) | 3/4 (19.05) | 1 (25.4) | 1-3/8 (34.9) | 2 (50.8) |
| Range ACFM | 0.14 to 5 | 0.25 to 10 | 0.4 to 16 | 0.7 to 27 | 1 to 50 | 2 to 80 | 5 to 200 |
| Range LPM | 4 to 141 | 7 to 283 | 11.3 to 453 | 20 to 765 | 28 to 1416 | 56 to 2265 | 141 to 5663 |
| Range m3/Hr | 0.24 to 8.5 | 0.42 to 17 | .7 to 27 | 1.2 to 46 | 1.7 to 85 | 3.4 to 136 | 8.5 to 340 |
| Range CFH | 8.4 to 300 | 15 to 600 | 24 to 960 | 42 to 1620 | 60 to 3000 | 120 to 4800 | 300 to 12000 |
| ACFM = Actual Cubic Feet per Minute LPM = Liters Per Minute m3/Hr = Cubic Meters per Hour CFH = Cubic Feet per Hour |
|||||||
| MODEL | A | B | C | D | E | G | H | I.D. | O.D. | |
|---|---|---|---|---|---|---|---|---|---|---|
| VF563AA | Inches | 1.22 | 3.84 | 2.5 | 6 | 3.44 | 1.88 | 1.25 | 0.38 | 0.5 |
| mm | 30.99 | 97.54 | 63.5 | 152.4 | 87.38 | 47.75 | 31.75 | 9.65 | 12.7 | |
| VF563A | Inches | 1.22 | 3.84 | 2.5 | 8 | 3.44 | 1.88 | 1.25 | 0.5 | 0.63 |
| mm | 30.99 | 97.54 | 63.5 | 203.2 | 87.38 | 47.75 | 31.75 | 12.7 | 16 | |
| VF563B | Inches | 1.22 | 3.84 | 2.5 | 8 | 3.57 | 1.88 | 1.25 | 0.63 | 0.75 |
| mm | 30.99 | 97.54 | 63.5 | 203.2 | 90.68 | 47.75 | 31.75 | 16 | 19.05 | |
| VF563J | Inches | 1.13 | 3.85 | 2.59 | 8 | 3.68 | 1.9 | 1.25 | 0.75 | 0.875 |
| mm | 28.7 | 98 | 65.8 | 203 | 93.5 | 48.3 | 31.75 | 19 | 22.2 | |
| VF563K | Inches | 1.13 | 3.85 | 2.5 | 8 | 3.95 | 1.9 | 1.25 | 1 | 1.125 |
| mm | 28.7 | 98 | 63.5 | 203 | 100 | 48.3 | 31.75 | 25 | 28.5 | |
| VF563C | Inches | 1.72 | 3.84 | 3 | 12 | 4.34 | 1.88 | 1.25 | 1.37 | 1.5 |
| mm | 43.69 | 97.54 | 76.2 | 304.8 | 110.24 | 47.75 | 31.75 | 34.8 | 38.1 | |
| VF563F | Inches | 1.72 | 4.34 | 3 | 15 | 5.09 | 2.13 | 1.5 | 2 | 2.25 |
| mm | 43.69 | 110.24 | 76.2 | 381 | 129.29 | 54.1 | 38.1 | 50.8 | 57.15 | |
| VF563G | Inches | 2.47 | 6.97 | 3.75 | 18 | 7.09 | 3.44 | 2.81 | 4 | 4.25 |
| mm | 62.74 | 177.04 | 95.25 | 457.2 | 180.09 | 87.38 | 71.37 | 101.6 | 107.95 |
Why Applied Measurements?
- Suppliers of top quality strain gauge sensors and transducers to every corner of industry - UK and worldwide
- Over 100 years of expert transducer knowledge
- Our high quality products all come with a 3 year warranty
Popular Products
Platform Load Cell | Single Point Load Cell | 0-250g to 0-40kg | OBUG
0-250g to 0-40kgFrom £128Universal Load Cell | Universal S-Beam Force Sensor | DBBSM
0-1kg up to 0-30,000kgFrom £254Buy OnlineHandheld Load Cell Indicator | Digital Display | TR150
From £308Buy OnlineStrain Gauge Displacement Sensor | Linear Position Sensor | AML/SGD
0-5mm to 0-100mmFrom £425Buy Online


